Your personal Tumblr library awaits
Tutorial - Blog Posts


Some people have been asking me what are the brushes (SAI) I use and… here they are. Since my English is SO poor I could not explain how I work with those brushes, so I decided to use only images, snif.
Mmm, in summary, these are the brushes I use and some examples of how I paint with them (my art is so inconsistent that my way of painting varies according to my mood, LOL). I’m really sorry for not being able to answer all your questions 😭 I hope this helps someone 💜
I take this opportunity to thank all the people who send me messages, I appreciate each one of them, really thank you 💜 ✧ Instagram ✧ Twitter ✧ Store ✧


Watercolor Tutorial with Yoichi Nishikawa
"Follow along and learn more about the whimsical beautiful world of background art with Yoichi Nishikawa. In this 30-minute tutorial Yoichi walks through the process, shares techniques, and introduces the tools used to create his signature airy cloud backgrounds. Academy Museum family day programs are made possible in part by a grant from the City of Los Angeles Department of Cultural Affairs. To protect the health of our community, the Academy Museum enforces health and safety protocols that are kept up to date on our website." - Academy Museum Youtube Description

“Sneaker and ankle drawing techniques”
Source: Twitter at takuya_kakikata

Drew these instructions for a one-page zine I'm gonna share tomorrow and I figured I'd post them on their own just in case anyone finds them useful :)


I made this zine last year to teach Japanese stab binding. It's a technique that every artist should know—with just a few tools, it's so easy to bind your own sketchbook or to make a physical version of your art/writing/etc. Download the PDF version (with bonus photos & tips!)
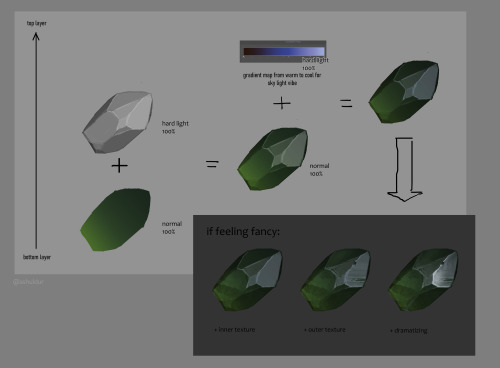
Figured quick gem render recipe for myself, sharing bc why not
I needed a quick way to go from non-transparent grayscale, so here you basically start with bw non-opaque rock without details
"dramatizing" is just glare + gradient on some planes
Hey, hope you're having a great day!
Just wanted to say that I LOVE how you use colors in your work, it's just so pretty, sometimes vibrant, sometimes dark, the ones where you use one color but different shades and saturation are so beautiful!
Maybe you can give some advice how to improve in this area? Idk recommend some resources that helped you or exercises? Little tricks or your general thought process when coloring your art? Teach me sensei 🙏


Whenever you see a drawing with a color palette that you like try to analyse it. You can break it apart and see what colors were used and how they were used.
Hope this helps!

Hi! Do you have any tutorials for glitter/sparkles?

By Cosmos Kitty

by 23i2ko


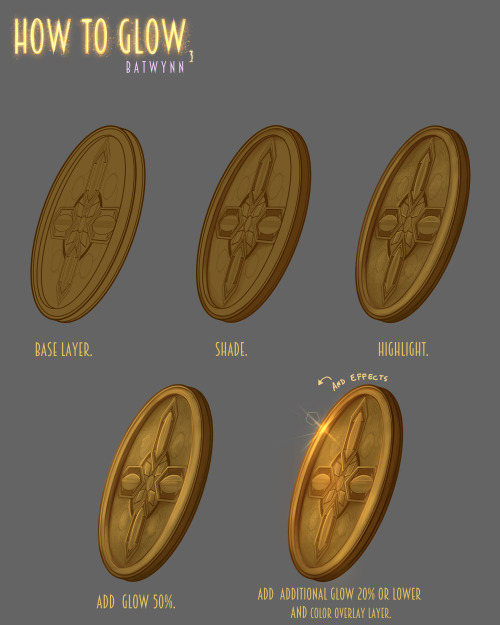
I have to draw a lot of gold and metal for my work, but wasn't happy with any of the metal tutorials i could find around. I prefer really specific instruction, so after some research i put together what i think works as a generalist's guide/tutorial. Not perfectly accurate, but i hope it's helpful!
Do yourself a favor. Learn to code. Here's how.
I’ve said this to my non-techie friends countless times. It’s no secret that being able to code makes you a better job applicant, and a better entrepreneur. Hell, one techie taught a homeless man to code and now that man is making his first mobile application.
Learning to code elevates your professional life, and makes you more knowledgeable about the massive changes taking place in the technology sector that are poised to have an immense influence on human life.
(note: yes I realize that 3/5 of those links were Google projects)
But most folks are intimidated by coding. And it does seem intimidating at first. But peel away the obscurity and the difficulty, and you start to learn that coding, at least at its basic level, is a very manageable, learnable skill.
There are a lot of resources out there to teach you. I’ve found a couple to be particularly successful. Here’s my list of resources for learning to code, sorted by difficulty:
Novice
Never written a line of code before? No worries. Just visit one of these fine resources and follow their high-level tutorials. You won’t get into the nitty-gritty, but don’t worry about it for now:
Dash - by General Assembly
CodeAcademy
w3 Tutorials (start at HTML on the left sidebar and work your way down)
Intermediate
Now that you’ve gone through a handful of basic tutorials, it’s time to learn the fundamentals of actual, real-life coding problems. I’ve found these resources to be solid:
Khan Academy
CodeAcademy - Ruby, Python, PHP
Difficult
If you’re here, you’re capable of building things. You know the primitives. You know the logic control statements. You’re ready to start making real stuff take shape. Here are some different types of resources to turn you from someone who knows how to code, into a full-fledged programmer.
Programming problems
Sometimes, the challenges in programming aren’t how to make a language do a task, but just how to do the task in general. Like how to find an item in a very large, sorted list, without checking each element. Here are some resources for those types of problems
Talentbuddy
TopCoder
Web Applications
If you learned Python, Django is an amazing platform for creating quick-and-easy web applications. I’d highly suggest the tutorial - it’s one of the best I’ve ever used, and you have a web app up and running in less than an hour.
Django Tutorial
I’ve never used Rails, but it’s a very popular and powerful framework for creating web applications using Ruby. I’d suggest going through their guide to start getting down-and-dirty with Rails development.
Rails Guide
If you know PHP, there’s an ocean of good stuff out there for you to learn how to make a full-fledged web application. Frameworks do a lot of work for you, and provide quick and easy guides to get up and running. I’d suggest the following:
Cake PHP Book
Symfony 2 - Get Started
Yii PHP - The Comprehensive Guide
Conclusion
If there’s one point I wanted to get across, it’s that it is easier than ever to learn to code. There are resources on every corner of the internet for potential programmers, and the benefits of learning even just the basics are monumental.
If you know of any additional, great resources that aren’t listed here, please feel free to tweet them to me @boomeyer.
Best of luck!


Quick little gouache practice! 🌼💙🌼 tutorial by Journal Away on youtube


White Diamond wig EXPLAINED. Many people asked how I made my glowing wig for WD, so here I come with some progress pics and explanation. Enjoy! Numbers correlate to order of wip pics
1. I started with a base for the wig. I made patterns by covering my head with foil and paint tape and than just cut it into pieces that I transferred onto thick foam (5mm). Then I glued it together to have base "helmet". 2. I made paper patterns for the main body of the wig, by sticking paper pieces together with tape and some clips, until I was satisfied with the shape I moved on. 3. I traced the patterns onto thin styrofoam pieces (5mm, it was a styrofoam used for decorating ceilings, it was extremely cheap like 2 € for a lot of sheets) 4. I glued all the pieces onto the halmet starting with whole spikes and than gluing them to the base (I used hot glue but hot enough to become liquid but not hot enough to destroy the styrofoam. It was tricky) 5. I left some holes in styrofoam for place for batteries and to have a way of putting polyurethane foam inside the structure (the stuff to isolate windows etc.). I did it cuz styrofoam itself could break (now stuffed with foam it is seriously VERY sturdy, It survived a lot by now). After letting it grow and dry I cut off the excess foam and made a bigger hole for batteries at the back of my wig. I also painted white some parts. 6. Now lights! I used wire LEDs with batteries (because I am not into electrical stuff at all, it was cheap lights for christmas decorations) and just glued the wires with LEDs (hot glue) to the front side of the wig. Battery pack went to prepared place at the back. 7. Now to cover it with hair! Using the same paper patterns as earlier, I cut pieces out of very thin white foam (0,5-1mm) and I carefully glued synthetic hair to them (vinyl/tacky glue). 8.Then I glued whole panels to my wig (hot glue again) and trimmed the excess hair. I also glued some loose hair to the front. I ended everything with a lot of hairspray and glued my gem to the wig. And so it was done!
I hope it will be in some way helpful to you :)
White Diamond cosplay by me - Vanthica


UMBURGRR!!!!!!!!!!!! PLEASE DRAW A DOODLE OF RIDDLE ROSEHEARTS AND MY LIFE, IS YOURS.
OKAY but fr though your art is so MAJESTIC!!!!???!! I swear it has this aura that makes it so compelling, the way you color and render makes all of your works so appealing to the eye and your style is genuinely just AMAZING!!!!!! (if you don’t mind, what art program and brushes do you use??) anyways sorry for talking so much THANK YOU SO MUCH AND HAVE A GREAT REST OF YOUR DAY!!!!!!
GIGGLING right now you're too kind 😭❤️ but honestly, thank you so much it means so much to me (i cry) and ofc! here's my brushes, program, and process 😎 (ft. mr riddle rosehearts)
For my art program I use procreate with a canvas of 300 dpi and for brushes I use kraymer's hard brushes on gumroad !!
Anndd here's how I apply them:


how to improve your cursive // [sub here]
i hope you guys enjoy, my cursive has improved ten folds over the past 3 months, and due to these tips it’s gotten way better. i’m still practicing but these tips really helps for me, i hope it does for you too
Easy Makeup Tips for a Quick, Flawless Look
When it comes to makeup, I like to keep things simple and efficient, especially on busy days. Over time, I’ve found a routine that works for me and gives me a polished look without spending hours in front of the mirror.
First things first: I always start with a clean, moisturized face. I give my skin a few minutes to soak in the moisturizer—it makes a huge difference in how smoothly makeup applies.
Next, I apply a makeup primer with rice protein. This step is essential for keeping my skin matte and shine-free all day. Having dealt with acne in the past, the "dewy" look isn’t for me, so this primer is a game-changer.

Most days, I skip the heavy stuff like foundation, concealer, and powder unless I’m going for a full-face look. Instead, I focus on enhancing my eyes and brows.
My Quick Eye & Brow Routine:
Brows: I use a brow tint to define my shape and pluck any stray hairs to keep things clean and tidy.
Eyeshadow: Since I have hooded eyes, I keep it simple:
Apply a light, sparkly shadow on the brow bone for a subtle highlight.
Use a darker shadow on the upper lid for depth.
Finish with a white, shimmery shadow on the inner corners for brightness.
Eyeliner: A thin line of black liquid liner on the outer half of my top lid with a small wing works wonders for my eye shape.
Optional Pop: Sometimes, I’ll add white eyeliner on my waterline to make my eyes appear bigger.
Mascara: A few coats to define my lashes, and I’m good to go!
For lips, I keep it low-maintenance with a swipe of clear gloss or Vaseline. It keeps my lips hydrated all day without feeling sticky or heavy.
Life Hack:
If you struggle with oil and shine throughout the day, makeup blotting papers are your best friend. These small, portable sheets soak up excess oil without messing up your makeup. They’re compact enough to fit in a pocket or purse, making them perfect for touch-ups on the go.

This routine is quick, easy, and leaves me feeling confident without overdoing it. What’s your favorite go-to makeup trick? Share it below—I’d love to hear!
What I Wish I Knew When Walking Into Retail as an Adolescent
I started working at age 18 and had a lot of difficulty with social cues. If I could teach you anything, it would be that being in public is going to be awkward and that is okay.
My first job was at a grocery store. I was so nervous entering my first shift that I remember my whole body shook with anxiety.
It felt like the entire town was in my line for the sole purpose of watching and judging me. My very first customer was this petite old lady wearing a red bandana in her hair.
Her words seemed to instantly soothe me, "Don't be so nervous; you are doing great!" I swear she could read my brain, and while this did not completely dissipate all fears, it was what I needed to hear at that moment.
Just as finding a comforting anchor is important, so too is the ability to have fun through social interactions. You will have so much more fun at your job if you can find ways to be friendly with potential customers.
Acting as a patron, I have had several grocery store checkout encounters that followed the tune of,
"Hi, how are you?"
"Oh I'm fine, and you?"
"Living the dream."
I cannot stress how boring and nuanced this exchange is.
To step up your retail game, I would highly recommend trying one of two things; either learning to recognize returning customers or learning more about the products of your store.
One of the best moments I've had in retail was when I recognized a customer having to come back in again that same day for something they forgot to grab for a holiday dinner and was able to immediately point them to the right aisle. When you greet each person that enters the store, you have a great chance of improving someone's mood. It's amazing how a simple acknowledgment can make a customer feel more comfortable in your store.
Equally important is being able to talk about a true admiration for a product or manufacturer. You would be surprised how a couple of deep debates about which M&M's trial flavor Mars should choose to make a permanent product can make 8 hours fly by in a wink.
Having a genuine love of a product can foster enthusiasm not just for your customers, but for you as well.
On the other hand, I have to advise you of one terrible social faux pas I once made.
I once picked up a tall cylindrical container on a lone night shift and inquired to the customer, "I have not tried this sauce. Is it any good?"
It wasn't until I flipped the bottle over and read ‘Personal Lubricant’ on its label that I understood what I was scanning. My customer did not answer and I never saw her again, understandably.
Finally, this last point is the heaviest and details a specific example of sexual harassment. If this is a sensitive topic for you, I would love to encourage you to jump to the last paragraph.
I continuously struggle with recognizing the difference between flirting and being sexually harassed. The only guidance I can give you is to ask yourself if you are feeling comfortable in a similar situation. If you are not, try to find your voice and speak up. If the other party can't back down after you request they stop, this is textbook harassment (of any form.)
Without further ado, here is my experience. When I moved from my first job as a cashier, I became a sales associate at a tech store.
I once dealt with a man who drives semi-trucks for a living. Anyone reading this who has been in retail or food service may know exactly where this is going already.
I can still recall his slicked-back greasy hair, backwards ball cap and terrible breath. The week leading up to this moment, I had decided to cut and brightly dye my hair. Immediately, my hairstyle seemed to attract sordid attention.
For over an hour, I remember explaining a product, setting it up and troubleshooting any issues that may come up. In between words, this driver made multiple crude remarks about his wild imagination involving me, him and my purple pixie cut. A friend that he had brought along with only encouraged him by laughing at each comment made. These varied from asking me on nasty dates to probing for my cell number.
I felt trapped by the long product setup and sales process as he made passes toward me. He thought that my eccentric hair meant that I was 'easy.' When I pointedly told him I had a boyfriend, he retorted with, "I know you would love to take a ride on my hairy bush."
I felt so sick about this last comment and was grateful when the sale was finished. I had tried so hard to handle a 'tricky customer' and deescalate the situation. It was only after he and his friend left the store that a coworker came over and told me how she wanted to scream at him to get out and couldn't believe how he was treating me. We then told our boss about the situation.
That same day, the truck driver came back in for product help. I was working in the back of the store when my boss came and told me, "Hey, your boyfriend came back. He's waiting for you." I could have strangled him.
Years later, I still have so much anger over this situation. I am disappointed in myself for not having self-respect or even recognizing the vulgarity of that particular sale. I held a longstanding grudge against my employer for treating me like fodder. And I held a strong hatred for this truck driver (and I'm sure this translated to an extreme hesitance when interacting with all semi-truck drivers in the future.)
In the final analysis of these events, I would like to reassure you that even though the public school system can't socially prepare you, you won't drown if you can remember to find peace, make genuine connections, and respect yourself.
Please let me know if this was helpful and if you would like me to write about more of my retail experiences!

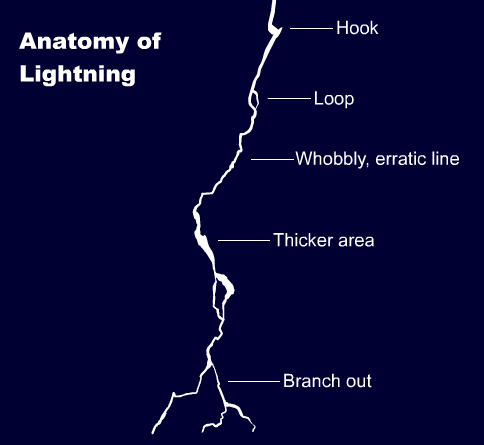
This picture is literally the first ever "tutorial" that explained something in a way that my ADHD ass understood.
Posting it here for anyone who would want it. Use the knowledge wisely!


I made an art/anatomy tutorial about birds! I hope people will find it helpful!


The-ford-twin’s contribution saved my brain. I knew this but I keep getting conflicting information online so I gaslight myself into thinking I’m wrong even though I do both digital and traditional media.
And eventually there will come a time where you can just paint your own way when you feel confident enough.

For anyone who wants a free pose-able human reference for drawing
The other day I came across this awesome program by accident (I don’t even remember what I was actually searching for, but on the several times I’ve looked for a program like this I’ve had no luck). It’s cool enough that I wanted to share it.

It’s called DesignDoll (website here) and it’s a program that lets you shape and pose a human figure pretty much however you want.
There’s a trial version with no expiration date that can be downloaded for free, as well as the “pro license” version priced at $79. I’ve only had the free version for two days so far, so I’m not an expert and I haven’t figured out all of the features yet, but I’ve got the basics down. The website’s tutorials are actually pretty helpful for the basics, as well.
Here’s the page for download, which has a list of the features available in both versions.
There are three features the free version doesn’t have:
Can’t save OBJ files for export
Can’t download models and poses from Doll Atelier (a sharing site for users; note that the site is in Japanese, though)
It can’t load saved files
The third one means that if you make a pose, save it, and close the program, you can’t load that pose/modified model later. You have to start with the default model. I found that out when I tried to load a file from the day before (this is why reading is important…). Whether saving your modifications (and downloading models and poses) is worth $80 is up to you.
But, the default model is pretty nice and honestly if all you’re looking for is a basic pose reference it should work fairly well as it is. Here’s what it looks like:

There’s a pose tag that lets you drag each joint into place and rotate body parts. The torso and waist can be twisted separately, and it seems like everything pretty much follows the range of movement it would have on an actual human.

Even the entire shoulder area is actually movable along with the joint! See, like how the scapular area of the back raises with the arm:

The morphing tag is one of the coolest features, in my opinion. It lets you pick and choose from a library of pre-set forms for the head, chest, arms, legs, etc. It has some more realistic body shapes in addition to more anime-like ones. Don’t like the options there? Mix a few to get what you want! Each option has a slider that lets you blend as much or as little as you want into the design.

So you, too, can create beautiful things like kawaii Muscle-chan!!

The scale tag lets you mess with the proportions and connection points of different joints. This feature combined with the morphing feature not only allows more body shape variations, but it also means that you can do things like make a more digitigrade model if you want. (The feet only have an ankle joint, but for regular human poses that’s all that you really need, so whatever.)

Or you can make a weird chubby alien-like thing with giant hands and balloon tiddies if that’s more your thing.

The ability to pose hands to the extent it allows is far more than I could have hoped for from a free program. Seriously, you can change the position of each finger joint individually, as well as how spread out the fingers are from each other. Each crease on the diagram below is a point of movement, and the circles are for spread between fingers.

And to make it a bit more convenient, there’s a library of pre-set hand poses you can pick from as well, and then change the pose from that if you like.
In both versions, you can also import OBJ files from other places for the model to hold, like if you wanted to have them hold a sword or something.
Basically, this program is awesome and free and you should totally check it out if you want a good program for creating pose references.

This article was written by Phil Straub back in 2005, and it is as fresh and vital today as it was then. Phil’s tips and trick are timeless, and can help you make your images pop!
Composition is everything! No amount of detail in an illustration or Concept Painting will be successful without a strong composition foundation.
Composition in Environment Concept painting can be quite difficult since your focal point usually isn’t as obvious as in a character piece. In this introduction to Composition we will explore the fundamentals used to create exciting and functional compositions along with a variety of composition techniques. Initially I will show some successful examples of iconic composition, formal composition, the rule of 3rds, the golden rule, etc. There will be a discussion on what makes each piece successful and an explanation on why the artist chose to describe the scene using a particular form of composition.


When you take the canvas area and divide it into ‘thirds’ Horizontally and Vertically, where the lines cross in the picture area is a ‘Golden Mean’, or the best spot in which to place your Main Subject or Object of Interest as it is the Focal Point of your picture. The golden rule originates from the Ancient Greeks, since they were great mathematicians as well as artisans, they came to the conclusion that there needed to be a certain balance in composition for it to be pleasing to the eye. They further developed this theory and defined what they called “power points,” Power points are located at the point where the lines used in the golden rule intersect. By placing a main subject on a power point, it further defined that subject as the focal point.
The golden rule can and usually is applied to a paintings canvas proportions. As you read through the following text you’ll notice that most of the imagery presented utilizes similar dimensions and almost all of them fall into the “golden rectangle.” Today you can find the Golden Rectangle almost everywhere: from credit cards to phone cards to book covers, all are shaped with its proportions. The Golden Ratio (the ratio of the longer and shorter sides of the Golden Rectangle) also appears in many natural phenomena. The ratio between the length of your nose and the distance from the bottom of the chin to the bottom of the nose is the golden ratio. The spiral growth of crustaceans follows the golden spiral. The divine proportions are an in-built (or in-grained) aesthetic parameter we judge beauty by.
The imagery [above] represents the division of space when the “golden rule” is applied to a blank canvas. Basically it is the division of a line in two sections, where the ratio between the smallest section and the largest section is identical to the ratio between the largest section and the entire length of the line. In other words A/B = B/(A+B). The ratio is about 1/1.618. Honestly, I’m still not exactly sure what that all means? but, I do know that I used this grid layout a-lot when I first started painting and found it helpful. I still do.
In the beginning you may find it useful to use this as an overlay for every concept piece you do. Having this grid float over your imagery as a reminder of where to place the objects of importance in the scene may help you as your develop your composition.

From the golden rule came the “rule of thirds” which is virtually the same concept but slightly altered to fit photographic proportions.I find it a bit easier to follow since it’s very simple in its origin.Here we have a look at the rule of thirds in action.
Notice that the main focal point sits right almost directly over one of the “golden means.” Additionally, other objects are placed near the other converging lines (the bird, for example) but, not directly on them, since that would create competition for the focal point.
There are Four Spots where these lines cross the Upper Left the Lower Left, the Upper Right and the Lower Right. Please note that all the “hotspots” are away from the center position in the picture frame.
The two best “power points” are the Upper Right and the Lower Right because the eye enters the picture frame at the lower left hand corner of the picture frame, travels to the center of the picture area and then reaches the right hand ‘Golden Mean’ position where it stops to look at the ‘Center Of Interest’.
The reason the eye enters a picture at the lower left side is because we are taught to read from Left to Right. This is a psychological fact that has been proven over the years. Next time you’re in an art gallery or art museum that shows the Old Masters paintings, notice how many have the Center Of Interest in the “Golden Rule” positions.


‘Implied Forms’ are a combination of ‘Implied Lines’ and they help to hold a painting together. The eye enjoys these interesting forms and will stay in the picture area to examine each one of them, if they are present. The following text and sample imagery will demonstrate a variety of implied forms and composition approaches.

The Circle is made up of a continuous ‘Curve’ and it’s circular movement keeps the eye in the picture frame. There are many circles in nature and man made objects. You can use the circle in a very obvious way in your composition or simply suggest it.
The image [below] is a very obvious and deliberate usage of circular composition. Notice how the circular shapes created by the dragons also follow a path that leads your eye towards the focal point.

Another example of circular composition! Again, I chose this type of composition to enhance the feeling of motion in the piece. You can see how the eye follows the circular shapes across the picture plane to the focal point. Something interesting to note with this image, it actually uses two composition approaches at one time; circular composition and iconic composition.


This has a ‘solid base’ and will show Stability. It also has Height and Strength. The Pyramids of Egypt have survived for thousands of years while other types of solid buildings have crumbled in to dust in less time. With the image below I was very deliberate with my arrangement of shapes so the triangle or pyramid composition is obvious. When I began this piece I simply started with a triangle shape as my starting point…nothing more than an abstract composition. I just let everything flow from there….and very quickly the painting began to take shape.


Is a connection of ‘Lines’ meeting in the Center and an expansion of ‘Lines’ leaving the Center. The Radii is usually found in Nature Subjects. The best example of the man made Radii is the spokes of a wheel.
The eye has two ways to go when it comes upon the Radii. It can either be drawn in to the picture area or it can be led out of the picture area. You must be careful how you used the Radii and try to have the eye led into the picture.


A showing of ‘Opposing Force’ that will give the picture a feeling of Cohesion and Relationship. The horizontal bar of the Cross will act as a “stopper’ while the vertical pole can act as a leading line. The windows in a large skyscraper will form crosses and will keep your interest in the building. The Cross also has religious meaning and the subtle use of the Cross can give hidden significance to an image.
In the painting below Hong Kuang uses the cross composition subtly. One could argue this piece is also using an “L Composition.” The strong line across the horizontal center that’s being formed by the characters body suggests “The Cross.” The somber facial expression and subject matter demonstrate an experienced artist’s ability to use symbolic composition to help tell a narrative.
To the right of that is Daryl Mandryk’s work which successfully combines a Cross composition with iconic composition. This is common composition choice for themes of heroism or comics. Fantasy artists like Brom and Frazetta use this type of composition in their work regularly.


This makes an attractive ‘frame’. It can be used to accentuate important subjects. Many times it is a ‘frame’ within a ‘frame’.
A tree with an overhanging branch at the ‘right’ side of the picture area will form a ‘Rectangle’ and help frame the Main Subject in the picture. By doing this you will make the Center of Interest stand out and be noticed clearly.


Some Art theorists contend that the most important information in the image should be placed near the center of the picture plane. This may seem confusing to some students since this contradicts many of the major principles of the “golden rule.” In general iconic composition should and can be used to describe a subject in a certain way. Iconic Composition or “Formal Subdivision” applies best to subjects of a dignified or religious nature. This style of composition was the approach of choice in earlier times and many excellent compositions have been made with it. Usually Iconic composition is used to describe symbolic subjects, heroic subjects, or religious subjects.

I’ve taken the liberty of drawing over this imagery to demonstrate the division of space in iconic composition. This is a technique used by many illustrators to help define the division of space and focal point when creating an iconic illustration. Well know and renowned illustrator Andrew Loomis used this technique extremely well and his book “Creative Illustration” to demonstrate this further.
Notice, that while the focal point is slightly off center, all the converging lines lead to the center point of interest. Additionally, notice how the figures head sits directly in the diamond shape of the overlay lines I’ve created. It should also be noted that I chose this composition to further enhance the regal and heroic appearance of the character.

Tong Wu uses Iconic composition perfectly here! Notice how the character again falls nearly at center of the canvas. I’ve taken the division of space a bit further on this imagery and have broken down the image into smaller segments so you can so how the artist balances everything in the piece.
Notice how the top right corner is almost a mirror image of the top left corner. In fact, look at almost any opposing segment in the painting, they are very similar! When creating iconic composition, it’s not necessary to duplicate each side exactly, but there should be a feeling of complete equalization of the units or masses, the line and spaces of one side with the other.

So, there you have it, a variety of ways to deal with division of space when you first begin visualizing a painting or drawing. At the end of the day, theses approaches to composition are guides and simply a place to start. Once you become more comfortable with composing a scene you can begin to push the boundaries of formal composition.
Since most Environment Concept Artists work in the entertainment industries, its expected you will be asked to create cinematic moments or “memorable moments” utilizing the environment as a stage.
You’ll want to use your mastery of composition to lead the viewer’s eye and really make the viewer feel like they’re in the scene. The single most important thing you simply must have in any Environment Concept Painting is a clear and dynamic focal point.
Without a place for the viewer’s eye to rest, the painting will lack impact and won’t hold the attention of your audience. It’s the job of the Concept Artist to visualize what can’t be visualized in reality. Concept Artists are the first step in every production and therefore must create dynamic imagery that the rest of the team will be excited to build. There are a few cinematic tricks that you can use as a Concept Artist to make things appear more dynamic.

Sometimes all it takes to add an extra bit of drama to your composition is a simple tilt of the camera. In the image to the right the viewer really feels like they are part of the action, simply by slanting the camera a bit. This approach is especially useful when you are trying to depict action in your environment.


Many Concept Artists today, myself included, use perspective as a tool to create dynamic compositions that appear to have motion and lead the eye to the focal point clearly and concisely.
In the painting below you will notice I’ve used many of the objects that appear in the painting as opportunities to further guide the viewer to the “payoff.” Additionally, I tilted the camera a bit to add to the action.

http://www.cgsociety.org/index.php/CGSFeatures/CGSFeatureSpecial/phil_straub_composition_tutorial